Thursday, December 29, 2011

On Holidays this week....

And it is so nice to be able to just sit back and ...breathe...for a change!! No rushing here or there...and I am getting lots of sewing done! Of course, everything happens when you go on holidays- lots of new fabrics and patterns arrive!


I am sneaking them into the shop as I can, so keep checking out the New Arrivals section!
More new season Hilco, other fabrics from Germany and our very own Sweet Things knits have arrived!


Dress is from Otto 3/2011, #40. The Colour Block Dress. 
I have used for the  sleeves and neckband  the lovely new Lilac Gitta.

And followed this up with 2 pairs of leggings and my table is covered in projects at the moment!
More sewing pics tomorrow!

Wishing you all a lovely break!


Sunday, December 18, 2011

Five Stones

I am one of "those" mums that gifts children with books, crafty or educational items As an aside, I am also one "those" mums that does not allow Coke or white bread in the house. If the kids get to have McDonalds for a treat, it's the healthy option and NO coke, ever! ( much to the chagrin of our local Maccas, before they bought in bottles of water...

Maccas: " ..you can't have a Happy Meal with no Coke, the drink is part of it".
 Me: " Just keep the Coke, we only want the food and toy"  ..
Maccas" .. " we can't do that.."  
Me:  "  Well tip the Coke down the sink I'm not taking it".

My kids friends think I am a little nuts but hey, they just may be right! We don't do Coke for several reasons, only one of them being the sugar issue and TEETH! The rest are political, and I wont bore you here.

So comes the Festive Season, and the kids want to gift their besties. Apparently, lollies are required, and maybe a card. But it MUST be lollies, Mum, or else we will be BANISHED.  

I much prefer my idea. handmade  Five Stones sets, with instructions. Much better for the grey matter, hand and eye coordination and fine motor skills. There is a free tute here .


 How is your Christmas Crafting going? We need to try and eat here,  somehow...

 ..the verandah 's looking pretty good ( then I don't need to pack up!).

~Lisa~


Saturday, December 17, 2011

Hysterical Christmas Crafting!

This year I am so very organised with the purchased gifts..all wrapped and under the tree, but so far behind on the handmade ones! Why oh why, did I not start these during the year??? Here's a few Softie ideas I LOVE...

Bullseye! From Running with Scissors.


Squirrelly from Studio Tantrum


One Eyed Monster by Fiskars

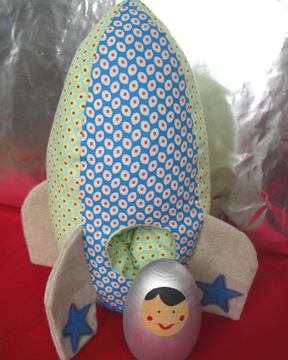
Rocketman by The Long Thread


And a Despicable Me Minion!


Happy Crafting! I'm heading back to the machine!

~Lisa ~


Tuesday, December 13, 2011

MAMU Design LEA pattern review

Mamu Design LEA shirt is part of the Basic Pattern Collection. LEA has several options, a spaghetti strap top, a notched neck tee, round neck or v neck. You can choose between three sleeve options, short, puffed or long ( the spaghetti strap top has no sleeves , of course.).

On the weekend I made up two of the spaghetti strap tops. I first I was not all happy with,it gaped all over and has been relegated to the nighty drawer. The second, I cut smaller in top and added a few gathers in the middle front and back. It sat much better, but still needs a little work. I also lengthened a lot. Still not happy with it, however, so will continue to work on it. I thought it may just be my shape, but not sure.


Then I cut out the LEA round neck tshirt., in a red cotton/elastomeric knit. using some Stenzo polka dot knit for the neckband and sleeves. After my experience with the #2 model, I was a bit nervous. Mamu Design provide you with a 5mm seam allowance, so I stuck with that. I cut the size 52/54 (XXL). ( the great thing about Mamu Design, they go from 32/34XS- 52/54 XXL).

The tee shirt went together like a dream, I did not even read the instruction just went ahead and made it my way. What  doI love about this? The sleeves are quite close cut, so very flattering. The shirt has a graceful flare from the waist out- not too much..but just enough to hide a few lumps and bumps!The all over effect is lovely and I am planning many more! Of course, I just had to add a velour...gorgeous deer head.


Sunday, December 11, 2011

21st and THE BEST cake EVER!


A week ago, our eldest had his 21st birthday. Being away at uni ( studying architecture),


 ..he celebrated in Melboune with his peeps, but made it home this weekend.

Happy Birthday Darcy!


His one request? The same raspberry/malteser icecream cake I had made 5 years ago. I had lost the recipe..it came from a Super Food Ideas mag, and after a mag cull- tossed it.

Darcy looked high and low, and found an online discussion about the recipe having been removed from the Super Food Ideas section of taste.com But, someone had kindly posted the recipe. Darcy then, gleefully, passed it back on to me.


So here it is, in all it's glory. It serves a lot, make sure the servings are small as it is incredibly rich.

 Darcy's Chocolate raspberry ice-cream cake

Ingredients (serves 12)
• 200g butter, softened
• 1 1/2 cups pure icing sugar
• 5 eggs
• 400g good-quality dark chocolate, chopped
• 2 tablespoons coffee-flavoured liqueur (such as Kahlua or Tia Maria)
• 3 litres vanilla ice-cream (see note)
• 300g frozen raspberries
• 500g Maltesers (mixture of white and milk chocolate)
Method
1. Using an electric mixer, beat butter and sugar until pale and creamy. Add eggs, 1 at a time, beating well after each addition.
2. Place chocolate into a heatproof microwave-safe bowl. Microwave, uncovered, for 3 minutes on MEDIUM (50%) power, stirring every minute with a metal spoon, or until melted. Stir chocolate and liqueur into butter mixture.
3. Spoon ice-cream into a bowl. Stand at room temperature until softened. Mash raspberries with a fork. Stir into ice-cream.
4. Line base and sides of a 6cm deep, 24cm x 34cm (base) baking dish with baking paper. Place half the Maltesers into a plastic bag. Using a rolling pin, hit until roughly crushed. Spread over base of dish.
5. Pour half the chocolate mixture over Maltesers. Spoon over ice-cream. Top with remaining chocolate mixture. Crush remaining Maltesers. Press into chocolate. Cover. Freeze overnight. Serve.

Tuesday, December 06, 2011

Coming soon to a Crafty Mamas near you!!

Of course, there is only ONE Crafty Mamas shop- and that's this one. Often copied, but never equalled.


I have been busily packing orders and thinking..
" Wow, Crafty Mamas really DOES rock." 

The pretties in store just take my breath away, so I guess if I am still excited by what we have to offer, I must be on the right track! I have some amazing stuff heading our way from Europe,  including new Nordic patterns, just you wait and see. 

2012 is going to be a very Crafty year, indeed!

Another one of my small projects, has been getting our own fabrics printed here in Australia. It's been quite a journey as initially, I knew very little about the process involved- and I am also very fussy about end products. Lucky for me, I have excellent people to help, to listen to my never ending questions, and to direct. My first foray into fabric printing has been helped along by the very clever Gaby of Janeas World. Gab went to work and came up with an exclusive design- just for Crafty Mamas!

Today I received the strike offs, which is the first test print to see how we like it and adjust colours etc.
Here's a peek...

This is printed on our  Aussie made STELLA,  our much loved cotton/elastomeric knit. 
There will be a few different colourways. So exciting!


Sunday, December 04, 2011

Easy T Shirt Neckline Binding TUTE

We looked at applying a simple banded neckline here so today we'll look at doing neckline binding on a t shirt.
This would the #1 finish that customers mention confuses them. Don't be scared to do these, they are so easy and look fabulous. You often see this type of neckline binding on Ottobre Design t shirts and sometimes on the sleeves too. This finish looks equally as nice on round necks, v necks, boat necks etc. It works well with all light/med weight knits. Not so well with chunky knits as you can't get it all tucked in nicely!


As discussed is our last neckline tute, you can either use the same fabric as your main garment, or do a mix match kind of thing as I did here. I prefer to use a fabric on the binding with a bit of lycra in it, as it gives you that snap back recovery.( so no baggy necklines). This t shirt is STELLA in Blood Red and the Scarlett and White striped knit.( no longer available).  Check out the last tute for a little method of calculating neckband length.

I start out by sewing up one shoulder ( again see previous tute as to why I prefer to do my necklines in the flat).


Then press open your shoulder seam. Here is our trusty neckbinding strip...

 This tee has small gathers in the middle of the front, so just ignore those bits for now..we will simply bind over the basting stitches, leaving pretty gathers.

Now flip your garment over, take your binding strip and begin pinning it  RIGHT side to the WRONG side of your neckline. Begin at one shoulder....I only put in a couple of pins at this stage....as you sew you will  be stretching the binding piece ever so lightly.

And so we sew on the binding piece. For your first couple of tries use your sewing machine people- in case you need to unpick.  Sew all the way..stretching the binding piece only- ever so slightly as you sew. This will help to incorporate more stretch into your neckline.

Here we are all sew on! Now turn your garment to the RIGHT side and give it a press, pushing your seam allowance upwards. This will be enclosed  within our folded binding ( don't get skittish on me, it's easy!).


Now the fun bit. We are going to fold our binding down once in half...then again.  The second time we fold, we will be enclosing the seam allowance from where we initially sewed on our binding strip.
It is sometimes easier if you do the first fold down..press with the iron, then come back and do your final fold. This particular knit is a bit curly and springs back when you press so I did not bother. I have heard others like to use a starch spray to keep their bindings stiff. I am happy to just "finger press"  as I go.


Continue all the way, folding your binding to enclose the seam allowance. This is a dreadful pic, sorry!
Use plenty of pins as you go here to secure all your layers.

Now to sew down your binding. I either use a sewing machine straight stitch set a bit longer ( 2.7) or the Coverstitch machine, a twin needle or a fancy stitch on my Bernina like this wavy serpentine stitch..


...from the RIGHT sew, stitch along the bottom of your binding piece, (the edge closest to your garment- not neckline). Go nice and slow, stitch from pin to pin...removing pin just before you sew.  When you have finished, give it a nice press with the iron to make it all sit in nicely. Then sew up your other shoulder seam as per previous tute and continue with your t shirt.


Easy Peasy? Clear as mud?


Saturday, December 03, 2011

Things I am loving at the moment... Milli meet Lilly


Featured are:

Clockwise from #1:
1; Milli  fairy tale ribbon
2: Janeas World Hearts knit
3: Oh My Deer woven label
4. Milli Pure Love label
6.Milli Pure Love ribbon
7: Red Gingham Bias Binding8: bambi Mini-Art woven label
9: Sanetta Red Gingham jersey
10:  Milli Cotton Woven 11: Happy Mushroom green label
12: Hilco fabric Campan knit Red and Pink
13: Crafty Mamas own Iron On velour DEER
Finally, Centre is TUCI Piroschka Party Dress


In the past two weeks, Crafty Mamas shop has had me ran off my feet! Hardly surprising, when you pop over and see the amazing products we have to offer. The downside, of course, in being busy is my lack of time to sew. So as I pack and fold, I dream up design boards....like above.

Inspired by a favorite little dwarf from Bavaria, Milli.


design:  GALERIE TAUSENDSCHOEN

Milli, you see, is a little dwarf who adores red and has long dark brown tendrils. My littlest dwarf, Lilly, loves red and has long, dark brown tendrils. Lilly has drawn the conclusion that Milli, is designed for her especially.  So let's not tell her otherwise?

~Lisa~

Monday, November 28, 2011

CRAFTY SUNDAY INSPIRATION

Yesterday Gil ( from Oz Handmade) and I headed off to Melbourne to the Australian Quilt Show. A three hour drive each way, but well worth the effort.


We got to check out lots of lovely new fabric ranges, see some cool gadgets in action, and meet some very talented designers ( Make it Perfect, Ric Rac, Saffron Craig, Two Monkey Fabrics). 

I came home with a bag full of Saffron Craig softie panels, some cool ribbons on order and fabric orders to plan! Oh and I may or not have called through to Simplicity this morning about a bias machine order...


So I am a bit late with my Crafty Sunday Inspiration, but here goes!

Continuing on with our " Christmas is almost upon us!" theme...


Cool Glittery projects from Oh the Lovely Things!

Awesome tile coaster tutorials from The Cottage Home

 I am loving these hairstyle Gertie has tried out from the new BUST book. Especially the Frida one!

 Convertible Clothing has me intrigued this week...

 How cool is from TS14Plus?!!

And finally, from the eldest Crafty Child...

Have fun typing like a Hacker!!

http://hackertyper.com/

From How to Geek.com
"Are you looking for a quick bit of good fun to “impress” your less computer-savvy family and friends with? Then you need Hacker Typer. Hacker Typer lets you produce awesome looking “1337 code” with just a few keystrokes"

Have a great week!

Lisa 


Ottobre Design Magazine 6/2011 Winners!

The winners of our 6/2011 are...

toadstooldots said...my favourite would be #25 as dresses here not that much liked atm.

thanks for that generous give away!
1:11 PM


Tas said...
Definately 19. Love a good cape! ;)

I have this already but promise if I win to have a giveawy on my blog and spread the word :)
1:18 PM

and..

fenna said...
I think #9 is super cute! fenna_otten at yahoo dot ca
3:40 AM

Congratulations ladies!

Please forward your mailing address to me!

Also, I am yet to hear from this winner of the Otto 50 Euro voucher..

Sabine said...
Happy birthday Crafty Mamas!!! Thank you very much for being here :-) Love Sabine

Delete


Friday, November 25, 2011

HILCO Summer 2012...in now!


My first delivery of HILCO Summer 2012 arrived this week.
And didn't it set our hearts all a-flutter?!
Fabrics are selling through very quickly, with more 24 more bolts due in 4 weeks.

HILCO, we LOVE you!

Just in time for Christmas dresses!

 ~Lisa~


Thursday, November 24, 2011

Ottobre Design Magazine 6/2011 Give-away...


I have 3 x Ottobre Design Magazine 6/2011 to Give-away!

Yep I am on a mission, folks, to convert you all to the joy that is


Simply leave me a comment, telling  me which pattern number in this issue you most love. 
Design sheet HERE

I'll draw 3 winners on Monday 28th!

Good Luck!


Monday, November 21, 2011

EASY T SHIRT NECKBAND Tute

I   have had  a few requests for t shirt neckband tutorials, so here is the first!

A very easy neckband application to an Ottobre Design pattern, issue is 2/2002, pattern #30.

This groovy fabric is one of our ZNOK knits, from Sweden. It is a cotton/lycra blend.  For the neckband I am using a strip of GITTE Cotton/elastine in Kiwi.


Here are my FRONT and BACK pieces.  When doing this type of neckband I find it easier to attach " in the flat"  instead of  "in the round" .Why? It is just a bit quicker than wresting with small necklines and my coverstitch machine prefers to work on flatter surfaces- so the less shoulder seams the better!

 So, I will sew up only one shoulder seam.

 One shoulder seam sewn! Go give it a press now.
 Here is my trusty pre-cut neckband strip. This the 4cm as specified by my pattern, but quite long. I have folded the strip in half lengthways and pressed. (it is popping open though!).

So the object of our mission here, is to get this strip of neckband attached to the neckline!

But how long do we need our neckband strip to be? Let's grab our trusty tape measure and measure our neckline opening....this one is 58cm. We'll call this Xcm. Otto suggest the following formula for calculating neckband/binding from knits:

From binding/neckband cut from the same knit you have made your top from(with a stretch/recovery of 20-30%):
cut your strip .85 x length of the edge to be finished Xcm. 

From ribbing ( with a stretch/recovery of 40-50%):
cut your strip .70 x the length of the edge to be finished Xcm. 

This formula is pretty good, but do take into consideration that knitsvary a lot, so you may need to experiment a bit first.In ye olden times, we used to just say cut the ribbing 2/3s the length of Xcm.

I am using GITTE which is a cotton/elastine knit, and it has a decent amount of recovery but not as much as the old style ribbing. I am going to go with the .85 calculation.

 Xcm (58cm) x .85= 49.3cm 

So my strip of neckband needs to be about 49.3cm long, plus 1cm seam allowance as we still need to sew up the other shoulder.


Now divide both your neckline it half and your neckband. With your neckline, actually pick your garment up and fold the neckline in half, don't assume halfway will be at the shoulder seam- it's not.Some also continue on and divide into 1/4s as well. I am naughty, I don't. I throw caution to the wind and just throw in a few more random pins.


Now begin to pin your neckband in place. Start by matching the middle pins on your neckband and neckline, and then match up your 1/4 marl pins ( because you will be very good, and have done that!).


And so now... we sew!
 Starting from one end, begin sewing...stretching the neckband  slightly as you go but NOT the neckline of the tee, to meet up with your next pin. ( be sure and remove pins before sewing!). You will eventually come to your 1/2 way mark, and now continue on sewing, slightly stretching the neckband as you go to enable it to fit the neckline area.


Here's what is should look like when your neckband it attached! 


Flip your neckband up and run off and give it a press, all the way around to make it sit nicely.
At this point, you may want to topstitch along the neckline with a slightly longer than normal straight stitch (2.7) or with a serpentine stitch or with a double needle or your coverstitch. Up to you. Just be sure and press before hand, so the seam is sitting nice and flat before you sew.Some do a double row of stitching with one row falling on the neckline and the other on the neckband. Have a look as some ready made tees to get some ideas.

Now sew up your remaining shoulder seam...


Trim back the thread on this final shoulder seam to a couple of cm's, then fold back on the actual seam..

...and sew a few stitches to secure it . This tucks it in nicely and stops those straggly threads hanging out the ens of sleeves and neckbands.

Easy Peasy. 
There will be a couple of other neckband tutes this week too!

~Lisa~


About Me

Crafty Mamas SHOP blog. Aussie agent for Farbenmix, Studio Tantrum, Stenzo fabric, Ottobre design. Stocking Hilco fabric, Mamu design and other cool stuff!