Monday, November 28, 2011

CRAFTY SUNDAY INSPIRATION

Yesterday Gil ( from Oz Handmade) and I headed off to Melbourne to the Australian Quilt Show. A three hour drive each way, but well worth the effort.


We got to check out lots of lovely new fabric ranges, see some cool gadgets in action, and meet some very talented designers ( Make it Perfect, Ric Rac, Saffron Craig, Two Monkey Fabrics). 

I came home with a bag full of Saffron Craig softie panels, some cool ribbons on order and fabric orders to plan! Oh and I may or not have called through to Simplicity this morning about a bias machine order...


So I am a bit late with my Crafty Sunday Inspiration, but here goes!

Continuing on with our " Christmas is almost upon us!" theme...


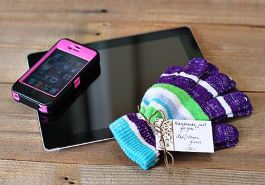
Cool Glittery projects from Oh the Lovely Things!

Awesome tile coaster tutorials from The Cottage Home

 I am loving these hairstyle Gertie has tried out from the new BUST book. Especially the Frida one!

 Convertible Clothing has me intrigued this week...

 How cool is from TS14Plus?!!

And finally, from the eldest Crafty Child...

Have fun typing like a Hacker!!

http://hackertyper.com/

From How to Geek.com
"Are you looking for a quick bit of good fun to “impress” your less computer-savvy family and friends with? Then you need Hacker Typer. Hacker Typer lets you produce awesome looking “1337 code” with just a few keystrokes"

Have a great week!

Lisa 


Ottobre Design Magazine 6/2011 Winners!

The winners of our 6/2011 are...

toadstooldots said...my favourite would be #25 as dresses here not that much liked atm.

thanks for that generous give away!
1:11 PM


Tas said...
Definately 19. Love a good cape! ;)

I have this already but promise if I win to have a giveawy on my blog and spread the word :)
1:18 PM

and..

fenna said...
I think #9 is super cute! fenna_otten at yahoo dot ca
3:40 AM

Congratulations ladies!

Please forward your mailing address to me!

Also, I am yet to hear from this winner of the Otto 50 Euro voucher..

Sabine said...
Happy birthday Crafty Mamas!!! Thank you very much for being here :-) Love Sabine

Delete


Friday, November 25, 2011

HILCO Summer 2012...in now!


My first delivery of HILCO Summer 2012 arrived this week.
And didn't it set our hearts all a-flutter?!
Fabrics are selling through very quickly, with more 24 more bolts due in 4 weeks.

HILCO, we LOVE you!

Just in time for Christmas dresses!

 ~Lisa~


Thursday, November 24, 2011

Ottobre Design Magazine 6/2011 Give-away...


I have 3 x Ottobre Design Magazine 6/2011 to Give-away!

Yep I am on a mission, folks, to convert you all to the joy that is


Simply leave me a comment, telling  me which pattern number in this issue you most love. 
Design sheet HERE

I'll draw 3 winners on Monday 28th!

Good Luck!


Monday, November 21, 2011

EASY T SHIRT NECKBAND Tute

I   have had  a few requests for t shirt neckband tutorials, so here is the first!

A very easy neckband application to an Ottobre Design pattern, issue is 2/2002, pattern #30.

This groovy fabric is one of our ZNOK knits, from Sweden. It is a cotton/lycra blend.  For the neckband I am using a strip of GITTE Cotton/elastine in Kiwi.


Here are my FRONT and BACK pieces.  When doing this type of neckband I find it easier to attach " in the flat"  instead of  "in the round" .Why? It is just a bit quicker than wresting with small necklines and my coverstitch machine prefers to work on flatter surfaces- so the less shoulder seams the better!

 So, I will sew up only one shoulder seam.

 One shoulder seam sewn! Go give it a press now.
 Here is my trusty pre-cut neckband strip. This the 4cm as specified by my pattern, but quite long. I have folded the strip in half lengthways and pressed. (it is popping open though!).

So the object of our mission here, is to get this strip of neckband attached to the neckline!

But how long do we need our neckband strip to be? Let's grab our trusty tape measure and measure our neckline opening....this one is 58cm. We'll call this Xcm. Otto suggest the following formula for calculating neckband/binding from knits:

From binding/neckband cut from the same knit you have made your top from(with a stretch/recovery of 20-30%):
cut your strip .85 x length of the edge to be finished Xcm. 

From ribbing ( with a stretch/recovery of 40-50%):
cut your strip .70 x the length of the edge to be finished Xcm. 

This formula is pretty good, but do take into consideration that knitsvary a lot, so you may need to experiment a bit first.In ye olden times, we used to just say cut the ribbing 2/3s the length of Xcm.

I am using GITTE which is a cotton/elastine knit, and it has a decent amount of recovery but not as much as the old style ribbing. I am going to go with the .85 calculation.

 Xcm (58cm) x .85= 49.3cm 

So my strip of neckband needs to be about 49.3cm long, plus 1cm seam allowance as we still need to sew up the other shoulder.


Now divide both your neckline it half and your neckband. With your neckline, actually pick your garment up and fold the neckline in half, don't assume halfway will be at the shoulder seam- it's not.Some also continue on and divide into 1/4s as well. I am naughty, I don't. I throw caution to the wind and just throw in a few more random pins.


Now begin to pin your neckband in place. Start by matching the middle pins on your neckband and neckline, and then match up your 1/4 marl pins ( because you will be very good, and have done that!).


And so now... we sew!
 Starting from one end, begin sewing...stretching the neckband  slightly as you go but NOT the neckline of the tee, to meet up with your next pin. ( be sure and remove pins before sewing!). You will eventually come to your 1/2 way mark, and now continue on sewing, slightly stretching the neckband as you go to enable it to fit the neckline area.


Here's what is should look like when your neckband it attached! 


Flip your neckband up and run off and give it a press, all the way around to make it sit nicely.
At this point, you may want to topstitch along the neckline with a slightly longer than normal straight stitch (2.7) or with a serpentine stitch or with a double needle or your coverstitch. Up to you. Just be sure and press before hand, so the seam is sitting nice and flat before you sew.Some do a double row of stitching with one row falling on the neckline and the other on the neckband. Have a look as some ready made tees to get some ideas.

Now sew up your remaining shoulder seam...


Trim back the thread on this final shoulder seam to a couple of cm's, then fold back on the actual seam..

...and sew a few stitches to secure it . This tucks it in nicely and stops those straggly threads hanging out the ens of sleeves and neckbands.

Easy Peasy. 
There will be a couple of other neckband tutes this week too!

~Lisa~


Sunday, November 20, 2011

CRAFTY SUNDAY INSPIRATION

Continuing my new Sunday series of inspiration I have gleaned throughout the week, and things I just plain LOVE.

Stephen King. He's the Man.  He owns his craft.


I'm  a very long time fan of Stephen King, I never have one or two of his books far from hand. And in the last few weeks I have discovered Stephen King audio books. Ooo wee..now I can take Stephen along for the ride with me in the car, Stephen is with me whilst I do the mundane chores around the house ( he helped me clean the oven the other day). Stephen makes an otherwise dull trip to the Big Smoke more manageable ( The Gingerbread Girl)  and although the kids and hubby yell at me to turn the ipod down ( apparently they can hear it too? ) a day out in the car with Stephen King and and my crochet and I'm in rapture.


And of course with Christmas coming up quick, my thoughts have turned a wee bit Festive...

Love this bookmark from Simple and Handmade

 Love these pinecone trees from Mom Tatstic

 Make your own snow cones with ArtyAnts.

And CRAFTYNESS you can eat...

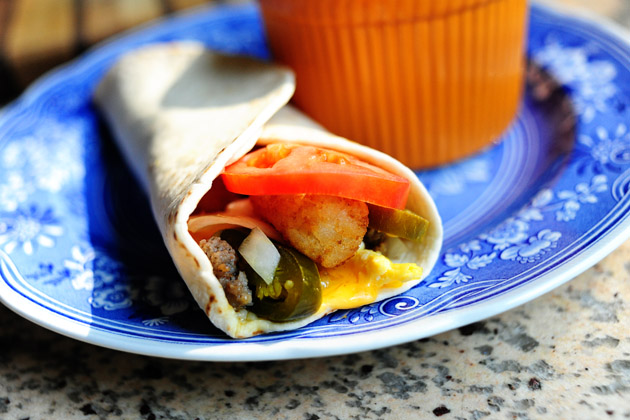
 The Pioneer Womans SuperSonic Breakfast Burrioto- yes please. My boys would love these.

And how cute are these? Happy Rainbow Cloud Cake pops?! 
And there is a book, Sweets on a Stick! 

And finally, my copy of the new Aussie mag SEAM arrived . What a lovely little mag.
Stunning pics and interesting people to read about. I think you will enjoy this, I am!

Have a lovely week,


Lisa x


Winners are Grinners at Crafty Mamas!

As our winners for the 2 x Ottobre Design Etsy shop vouchers ( each for 50 Euro) did not come forward, I have redrawn.

Our NEW winners are:

Sabine said...
Happy birthday Crafty Mamas!!! Thank you very much for being here :-) Love Sabine

Saturday, November 19, 2011

Ottobre Design Magazine Class 101. Part 2. Adding Seam Allowances


Let's look at  Ottobre Design  and adding seam allowance.

disclaimer again: no professional here, just a mum sewing at home!


Most European patterns will not include seam allowance. This holds true for Ottobre Design, Farbenmix, etc.  A common question on the Crafty Mamas forum, is

 “ what pattern pieces do I need to add seam allowance to?  

When it comes to Otto, always be sure to read the instructions completely before you begin,  often the cutting instructions for your pattern will list any particular instructions that are extra to the norm.

Ottobre Design  offer us this on their website...

The patterns include the necessary eases and hem allowances, but you always need to add 1 cm for seams. Any exceptions to this are stated separately.” ( told you so... read your instructions for your pattern ,clearly).

Sounds pretty simple, but it can get a little confusing when working with lots of pattern pieces!

Otto also tell us ( in the Instruction section) that...

  the patterns include hem allowance, button extensions and facing. When cutting out the garment pieces, add seam allowances of approx 1cm (depending on fabric) to each edge of the patterns".

So, we need to add a seam allowance to all the edges**, except our hems,. Otto include a small hem, I sometimes like to increase the depth. 

**Necklines. When constructing a garment with a neckline that is bound, it is not necessary to add a seam allowance to the neckline OR the neckline binding as it is already included.  This  also includes other bound areas ie;  t shirt sleeves, spaghetti straps style tops. 

If in doubt, always ask . You can email me with your pattern query and I will check for you. 

So, how to add the Seam Allowance?

If you do a search you will find folks are quite inventive when it comes to adding their seam allowance, and at what stage they add their seam allowance. I follow Otto’s advise and prefer to add the seam allowance at the cutting out stage. I prefer this as it allows me scope to adjust when cutting out. ie; some fabrics that are clingier, I might want to add more ease etc.

Some methods of adding seam allowance:

1.     Simply draw on with dressmakers chalk/texta/pencil  on the fabric , using a ruler all around the edge to measure your preferred seam allowance. 

2.       Just wing it, estimate as you cut- you dare devil you!  ( this is my preferred method!)

3.       Using an unthreaded wing tipped sewing machine needle


4.Using two pencils taped together


5.Rotary cutter with seam allowance guide attached.


6. Using carbon paper and a tracing wheel.


I guess it is just a matter of finding your fave method.


Adding Seam Allowance in action!


This is a favourite Otto issue , 2/2002. It is an oldie ( Non English) but a goodie. The t shirt pattern I have made before and loved. ( it also has a great spaghetti strap top too).

The fabric is one of the very cool ZNOKcotton/lycras. 

Here’s the pattern laid out....


Here’s my 1cm seam allowance being measured and added.
Note I have not added a seam allowance to the neck front or back.


Here’s my pattern pieces cut, ready to go. 


And here is my neckband, cut the recommended 4cm wide as per my pattern. I don’t cut the length yet, until I see how much recovery the fabric has. ( more in next tute). 


(and here is my bag of neckband  4cm strips, cut from scraps!)


Next tute we will look at..

*Symbols used in Otto patterns

 *T shirt- neckband construction , a simple neckband and neckline binding.

We will also have a chat about estimating the length of your neckband piece. 


Sunday, November 13, 2011

Crafty Mamas CRAFTY SUNDAY INSPIRATION

I have decided to start a new weekly series in my blog here, it will be, dear reader, simply...

CRAFTY SUNDAY INSPIRATION. 

Each Sunday I will simply post a few things that made me go "squeee"  this week,
a sharing of awsome-ness!


from Kristin Eldgridge Photograhpy
via Craft Gawker


A gorgeous Dotty Deer to make
 from Torie Jayne 
via Craft Gawker


From Ashley at Lil Boo Blue, 
 via Craft Gossip


 from Instructables


Happy Sunday

~Lisa 

About Me

Crafty Mamas SHOP blog. Aussie agent for Farbenmix, Studio Tantrum, Stenzo fabric, Ottobre design. Stocking Hilco fabric, Mamu design and other cool stuff!