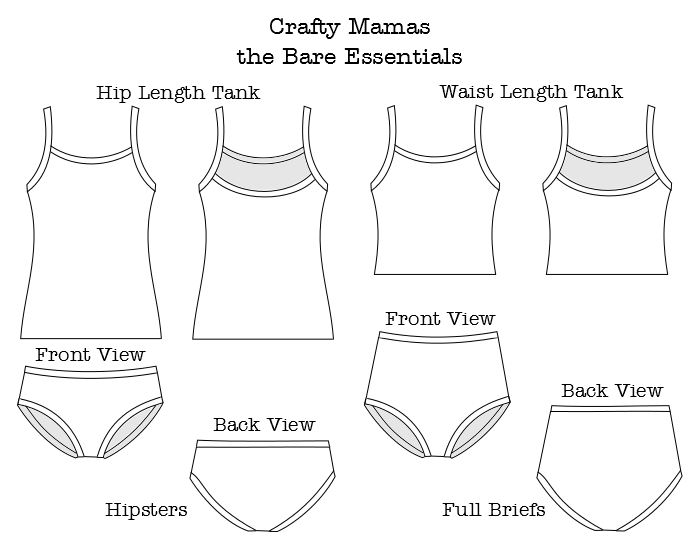
I am loving my new pattern, and word is, so are you! I strive to create fun, comfy and functional sewing patterns.- find my range here or purchase over in the right hand side bar- instand pdfs!
The Bare Essentials consists of a super comfy tank top in two lengths and amazingly comfy undies- elastic free- in full or hip style.


Let's sew up some Undie's of Awesome-ness! This is the " in the flat" method, where our bands are all attached before the side seams and waist are sewn up. Very quick and easy.
SUGGESTED FABRICS
The Bare Essentials are designed for knit fabrics, preferably with a spandex content. Jersey,
interlock or rib knits may be used. For best results, I recommend high quality knits from Crafty Mamas!
WORKING WITH KNITS
Repeat after me..."Knits are NOT scary. Knits are your friend!"
Seriously, they are very forgiving! You have a little wiggle room with knits!
Just a few hints to help....
Be sure to wash, dry and iron your knit fabrics before you proceed to cut out, as they may
shrink. Wash colours with like- as new fabric colours run still.
When cutting out, ensure you have the greatest stretch running around the body, and that the
fabric is resting flat on the surface ie; not hanging off a table, that may distort your cutting.
Some knits with spandex can experience rolling along the selvage, which is jolly well annoying
when you are cutting out your pattern pieces. Carefully trim off the selvage and your fabric will
sit flat.
Sew your knit fabrics either with an overlocker/serger - or a sewing machine using stretch or
ballpoint needles.
If using a sewing machine - check manual for suitable stretch stitches. For hemming, use a
stitch that will still allow your garments to s-t-r-e-t-c-h or you will get popped stitches. A triple
stitch, a serpentine (3 step zig zag), or use a stretch twin needle to great effect too.
Always have your iron handy, the key to getting good sewing results with knits is pressing each
seam as you go.
Cutting out your UNDIES!
Cut 1 x UNDIES FRONT on the fold
Cut 1 x UNDIES BACK on the fold
Cut 1 x UNDIES LINER on the fold
*Cut 1 x Waistband
*Cut 2 x Legbands
*A quick word about the bands. The cutting measurements we give are a rough guide, you may find your fabric is super stretchy and you need to make them shorter- play it by ear!

1. Lay out all the cut pieces [in the following order, named from the bottom up]. Front (right
side up), Back (wrong side up), Liner (wrong side up) ** For a full front liner, cut out another
front piece in lining fabric instead of using the liner piece.

2. Stitch the crotch seam using a 3/8” (1 cm) seam allowance


3. Seam finish the other end of the liner [optional, as knits do not fray]. **Skip this step if
you are using a full front lining.
4. Flip the liner forward so the seam is in the middle -- laying on the front piece. Make sure
to pull it completely flat and pin in place. **If you are using a full front lining, the liner will align
with ALL the edges of the front piece. Pop a few pins in to keep it all nice and flat.

In this tute, I am applying the legbands and waistband " in the flat", where we
apply the legbands before sewing up the side seams. Stitch one side seam, then
apply the waistband and stitch up remaining side seam.
Let's grab our legbands and waistband strips....
 And press them in half lengthwise....
 Now grab one of your legbands, and mark halfway with a pin or chalk. Then divide your leg opening in half and mark also. Pin band to opening ( if you are good.....as many as you need).

Place your legband, right sides and raw edges together, on top of the leg opening. We are now going to sew the band on, just the same as we did for our Tshirt here.
Starting from one end, begin sewing...stretching the legband slightly as you go but NOT the leg opening of the undies, to meet up with your next pin. ( be sure and remove pins before sewing!). You will eventually come to your 1/2 way mark, and now continue on sewing, slightly stretching the legband as you go to enable it to fit the leg opening area.

 Turn, and press nicely....here's one legband finished!
 Repeat with other legband and leg opening.... til you get both done! Press .
 Inside shot of our liner sitting nice and flat.
 Now see the seam allowance? Some folks like to topstitch that down, from the right side, using a serpentine stitch ( 3 step zig zag), to stop it annoying them. Personally, it does not bother me, so I leave.
Now we need to sew up our side seams! Lay your undies down, Front and Back together, right sides facing. Pin the sides- matching carefully the leg bands ( trim any excess legband you may have left).

When sewing " in the flat" you will always get a little bit of movement in your leg bands when you sew them- and this may cause them to be not aligned perfectly ( if this bothers you- go for sewing in the round instead, where the bands are enclosed and sewn on at the end). To minimize this movement, I like to pin the bands carefully together- and then begin sewing them with the sewing machine...then stop and return to over locker and go over it, continuing down the entire seam.

Here's our first side seam done!
 And opened out, give a good press...

 Now before we sew up the other side seam, we are going to attach the waistband! Press it in half, raw sides and wrong sides together...as we did for our leg bands. Divide in half, mark, and do the same for our waistband opening.
Sew on as we did the leg bands.. turn and press.

And now sew up the remaining side seam, just as we did the first one!
 Turn your undies right side out, press and topstitch around the waist if desired with serpentine stitch.
To finish off the ends where we have sewn up the side seams, trim back the thread on this final seam to a couple of cm's, then fold back on the actual seam..
Like this....


The Bare Essentials consists of a super comfy tank top in two lengths and amazingly comfy undies- elastic free- in full or hip style.


Let's sew up some Undie's of Awesome-ness! This is the " in the flat" method, where our bands are all attached before the side seams and waist are sewn up. Very quick and easy.
SUGGESTED FABRICS
The Bare Essentials are designed for knit fabrics, preferably with a spandex content. Jersey,
interlock or rib knits may be used. For best results, I recommend high quality knits from Crafty Mamas!
WORKING WITH KNITS
Repeat after me..."Knits are NOT scary. Knits are your friend!"
Seriously, they are very forgiving! You have a little wiggle room with knits!
Just a few hints to help....
Be sure to wash, dry and iron your knit fabrics before you proceed to cut out, as they may
shrink. Wash colours with like- as new fabric colours run still.
When cutting out, ensure you have the greatest stretch running around the body, and that the
fabric is resting flat on the surface ie; not hanging off a table, that may distort your cutting.
Some knits with spandex can experience rolling along the selvage, which is jolly well annoying
when you are cutting out your pattern pieces. Carefully trim off the selvage and your fabric will
sit flat.
Sew your knit fabrics either with an overlocker/serger - or a sewing machine using stretch or
ballpoint needles.
If using a sewing machine - check manual for suitable stretch stitches. For hemming, use a
stitch that will still allow your garments to s-t-r-e-t-c-h or you will get popped stitches. A triple
stitch, a serpentine (3 step zig zag), or use a stretch twin needle to great effect too.
Always have your iron handy, the key to getting good sewing results with knits is pressing each
seam as you go.
Cutting out your UNDIES!
Cut 1 x UNDIES FRONT on the fold
Cut 1 x UNDIES BACK on the fold
Cut 1 x UNDIES LINER on the fold
*Cut 1 x Waistband
*Cut 2 x Legbands
*A quick word about the bands. The cutting measurements we give are a rough guide, you may find your fabric is super stretchy and you need to make them shorter- play it by ear!

1. Lay out all the cut pieces [in the following order, named from the bottom up]. Front (right
side up), Back (wrong side up), Liner (wrong side up) ** For a full front liner, cut out another
front piece in lining fabric instead of using the liner piece.

2. Stitch the crotch seam using a 3/8” (1 cm) seam allowance


3. Seam finish the other end of the liner [optional, as knits do not fray]. **Skip this step if
you are using a full front lining.
4. Flip the liner forward so the seam is in the middle -- laying on the front piece. Make sure
to pull it completely flat and pin in place. **If you are using a full front lining, the liner will align
with ALL the edges of the front piece. Pop a few pins in to keep it all nice and flat.

In this tute, I am applying the legbands and waistband " in the flat", where we
apply the legbands before sewing up the side seams. Stitch one side seam, then
apply the waistband and stitch up remaining side seam.
Let's grab our legbands and waistband strips....


Place your legband, right sides and raw edges together, on top of the leg opening. We are now going to sew the band on, just the same as we did for our Tshirt here.
Starting from one end, begin sewing...stretching the legband slightly as you go but NOT the leg opening of the undies, to meet up with your next pin. ( be sure and remove pins before sewing!). You will eventually come to your 1/2 way mark, and now continue on sewing, slightly stretching the legband as you go to enable it to fit the leg opening area.


Now we need to sew up our side seams! Lay your undies down, Front and Back together, right sides facing. Pin the sides- matching carefully the leg bands ( trim any excess legband you may have left).

When sewing " in the flat" you will always get a little bit of movement in your leg bands when you sew them- and this may cause them to be not aligned perfectly ( if this bothers you- go for sewing in the round instead, where the bands are enclosed and sewn on at the end). To minimize this movement, I like to pin the bands carefully together- and then begin sewing them with the sewing machine...then stop and return to over locker and go over it, continuing down the entire seam.

Here's our first side seam done!


Sew on as we did the leg bands.. turn and press.

And now sew up the remaining side seam, just as we did the first one!

To finish off the ends where we have sewn up the side seams, trim back the thread on this final seam to a couple of cm's, then fold back on the actual seam..
Like this....
...and sew a few stitches to secure it . This tucks it in nicely and
stops those straggly threads hanging out the ends of sleeves and
neckbands, legbands etc.
Now how Quick and Easy was that?
Enjoy making your new Crafty Mamas " Bare Essentials" undies in the flat!