Sunday, May 26, 2013

Slow Sunday : Lamb and Veg slow cooker soup


 4 litres water
2 onions chopped
2 cloves garlic chopped
2 large carrots chopped
2 ribs celery chopped, throw in some of the leafy ends whole
1 chunk of pumpkin, about as big as your fist- diced.
1 lambs neck or shank. ( or both!).
1 x 375gm packet of Italian soup mix
1/4 x 375gm packet of pearl barley

1x 400gm can condensed tomato soup OR
400gm jar of pasta sauce OR 
a 400gm tin of tomatoes

Place all above in slow cooker. Cook on LOW about 8 hours, on HI about 5 hours, til meat falls from bones.
Remove meat from bones, throw out bones, shred meat and return to slow cooker.

Add either the soup or pasta sauce, salt and pepper, then allow to cook on LO for another 30 minutes..

Serve with fave homemade pizzas or crusty bread.  

Notes; you can also add some small pasta if you like. 

This make a LOT of soup. We generally freeze half and the other half feeds us twice as an entree or for lunch.

Enjoy!

Friday, May 24, 2013

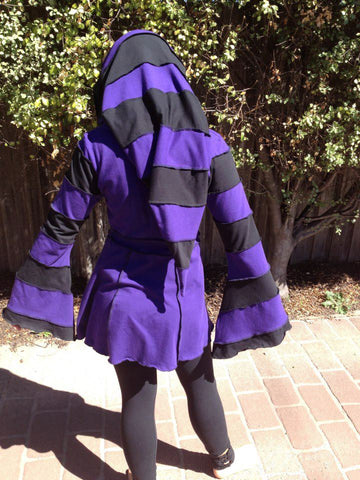
Farbenmix DANAI Hoody Sweater review


Farbenmix DANAI

The DANAI is an adorable hoody pattern. It sews up very quickly and although it is in German, with the online tutorial- DANAI is suited to beginners that have sewn with knits before. 
Best fabrics for your DANAI will be snuggly ones, so Nicky velour, sweat shirt knit, polar fleece etc. 

I left the bottom band off this one as I ran out of my hand dyed Nicky. ( and I can't remember what brew I used for this purple!). DANAI is sized very generously.You have the option of  kanga style front pockets, or the very much on trend at the moment - cut out circular pockets that are trimmed with rib.

The hood is very clever in that it has a lower section that keeps the child's neck warm. Love it. 

You can grab a DANAI here from Crafty Mamas Fabrics and choose from our beautiful range of snuggly fabrics here and here.


Sunday, May 12, 2013

New pattern release: Crafty Mams FRIDA!

Have you seen our gorgeous new sewing pattern??

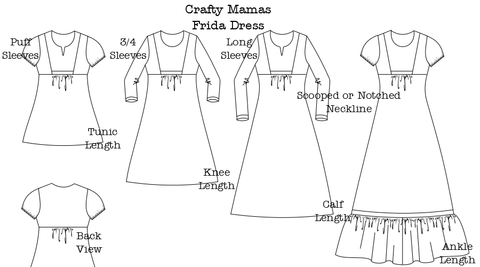
Our beautiful FRIDA dress/tunic is a pattern you will live in all year long! FRIDA is inspired by the colourful Mexican dresses of Frida Kahlo, with sweeping ruffled hems and burst of glorious colour and fun!


FRIDA DRESS is in ladies sizes XS-XXXL.  The Frida Dress is designed for knit fabrics with woven fabrics for an accent.  Jersey, interlock or rib knits may be used (recommended for the Front Side pieces and the Back Bodice pieces).  Quilting cottons or other lightweight woven fabrics can be used for the Front Center pieces, the Puff Sleeves, the Skirting and the Dust Ruffle.  For best results, I recommend high quality knits from us!

Crafty Mamas patterns are designed by me, and professionally drafted and graded by the very talented Jodi Jean Baird of Jocole patterns.


Grab a PDF version instantly here:
Or a paper version here!


Tuesday, April 16, 2013

Farbenmix XATER- A review and a little translation for you....

There have been Farbenmix  XATER tops popping up in the Crafty Mamas forum of late, and I have been dying to get one sewn up! That's the troube with being the shop keeper, you order all this gorgeous stuff in and never have time to sew yourself. But I staggered it out- in bits..traced one night, gathered supplies the next, cut another- then embroidered and sewed. I'm loving XATER and can see many more in my future.

Details:
Fabric is from my stash ( trying to deplete!) some 100% cotton knits..not Tamarama, thicker...can't remember the name. Anyhoo, Lil does not like STELLA - so I'm always looking for 100% cottons for her.

Ribbing is Hilco from the shop, in orange/turquoise

Applique is a machine embroidered ZNOK Deers star. Embroidery was from Huups...I think. Just a simple star that you can do nifty stuff with!


Farbenmix XATER is available in my store, Crafty Mamas Fabrics here. 
It is in German, but Farbenmix kindly provide a full step by step with pics! to hold your hand all the way. 
But having said that, it's a very easy pattern to sew. Here's a few tips to help!

XATER comes in two widths, the skinnier version ( Schmale Version), or the wider cut version. (Weitiere Version) I used the wider for this one, it is brilliant for kids with tummies).

You can make XATER with a hood or without ( if without, use my easy tute to apply a neckband  ).
XATER gives you the options of short sleeves, long sleeves, or short over the top of long- so heaps of variations here.

For the Skinnier version: Schmale Version
Pieces you will need:

1. Vorderteil (front)
2. Ruckenteil (back)
*note these are on the same pattern piece on the sheet, so you need to trace off the front, then the back. 
3.Armel - lang ( long sleeve)
4. Armelbundchen  (armband for your sleeve - cuff)
5. Kapuze ( hood)
6.Armel kurz, ( short sleeve)
7.Armelpatch ( patch for arm!)

For the Wider version ( Weitiere Version)

8. Vorderteil (front)
9. Ruckenteil (back)
 *note these are on the same pattern piece on the sheet, so you need to trace off the front, then the back. 
10. Armel - lang ( long sleeve)
11. Armelbundchen  (armband for your sleeve - cuff)
12. Kapuze ( hood)
13. Armel kurz, ( short sleeve)
7..Armelpatch ( patch for arm!)

The placement of the arm patch is not indicated on the sleeve piece, so you'll have to eyeball that  one.

Happy Sewing!

Lisa 


Monday, March 04, 2013

New release: Crafty Mamas " Off with the Pixies Dress/Tunic" Ladies version!

Why should the Kids get all the good patterns??  Just hit the shop, The Off with the Pixies for Ladies sizes xs-xxxl.


Only at Crafty Mamas Fabrics, grab your copy here and you too, can be Off with the Pixies ;)


Sunday, March 03, 2013

Ladies " Off with the Pixies" Dress/Tunic - new pattern!

As promised!! The Grown Up version of our much loved Crafty Mamas " Off with the Pixes" Tunic/Dress! 


As you can see, Miss B  is quite chuffed with her custom black and purple tunic!

Pdf  pattern out tomorrow, only at ...

CMF


Saturday, March 02, 2013

Farbenmix Clever Design Ideas ( or how to NOT sew BORING!)

I love this idea, simple strips of jersey are included in the seam of a HILDE top ( but use in any!). So effective!
 Check it out over on the Farbenmix site


Reverse applique always looks awesome too! From Farbenmix again!


And how amazing is this Chenille effect??? AWESOME ! Team Farbenmix again,  Check it out here!


Farbenmix products are available in Australia in our store, and we also handle wholesale orders!


Monday, February 04, 2013

The Homemade Pencil case

Life is just far too crazy around here, with Summer Uni, the kids home, Crafty Mamas Fabrics, C-R-A-Z-Y.
I start the day with huge lists to do, and it just gets longer as the day goes on! I miss my sewing machines so much- but I'm trying to get back in there! I have sewn a very little though!

I have been making a new pencil case for Miss B, ( who is 13 next month- how did that happen??) ever since she started Prep. She is now in Year 8. Lot's and lot of pencil cases!!! The previous years get a good wash up, and are often used to just stash things, or passed to the younger sibling ( who gleefully accepts half used textas, worn down pencils and blunt pencil sharpeners!).

There is something enjoyable about making  a pencil case.... something soothing about no brainer, straight line and insert zipper sewing ...and I love that Miss B instigates the creation of a new pencil case each year. I guess one day, she won't want one..(sob!). The size of the pencil case is always determined by what she has in mind on the day, and the fabric design.  Here's a look back at a few of our pencil cases!

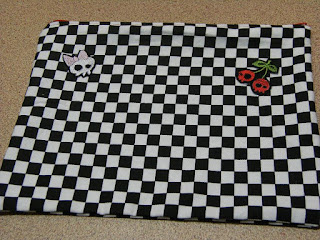
The LONDON pencil case... for 2013!


Wednesday, January 23, 2013

Ottobre Design Magazine 1/2013 Giveaway!

We have a Winner folks!!!

Blogger zofia said...
I would have to try those undies, very cute!
And how gorgeous are the chevron leggings?

Zofia, congratulations!!!! Popping your Otto in the post now!

~~~~~~~~~~~~~~~~~~~~~~~~~~~~~~~~~~~~~~~~~~~~~~~~~~~~~~~~~~~~


It's here!! Ottobre Design 1/2013!

It is always exciting when the first Otto for the new year arrives at Crafty Mamas- and 1/2013 is a beauty!


As always, we have several of the fabrics you see featured in the mag in store ( how could we not??)

Crafty Mamas has now been stocking and acting as agent for Otto for almost 9 years- that's pretty amazing in itself, but they just keep getting better and better! We offer subscriptions, back issues and Creative Workshop patterns, as well as stocking lots of the current issues for non subscribers.

Ottobre Design magazine features full size sewing patterns that you then trace off ( our Swedish Tracing paper is perfect).Otto patterns are fashion forward, and designed with comfort in mind. And the best part? They always work. ( life is too short to sew up dodgey patterns- which is why we only offer the best!).
 There are several tutes here on the blog on using your Otto patterns.
This issue is full of fun designs!

 I have ONE issue to Giveaway this week!

Simply leave me a comment, telling me which pattern # you would sew up first from 1/2013!


Winner announced next Mon!


 Lisa


Tuesday, January 22, 2013

Lillestoffe Giveaway Winner is...

ZoeH said...
Got to say 'Firemen' - my little boy's favourite game! They're all lovely though.

Friday, January 18, 2013

Some tutes I love...

Here's some of my fave tutes doing the rounds at the moment- I thought I'd share with you guys...

Pyramid Wrist Bags over at A Splendid Assemblage
Side split top by Cotton and Curls
Tshirt rug by The Creative Homemaker
The Raw Ribbon top over at Made it on Monday
Cool Arm warmers to make over at I Am Momma - Hear me Roar
That ought to keep you guys busy this week!

Lisa :)


Sunday, December 30, 2012

CM " The Bare Essentials" Undies Sewing Tutorial- in the Flat

I am loving my new pattern, and word is, so are you! I strive to create fun, comfy and functional sewing patterns.- find my range here or purchase over in the right hand side bar- instand pdfs!

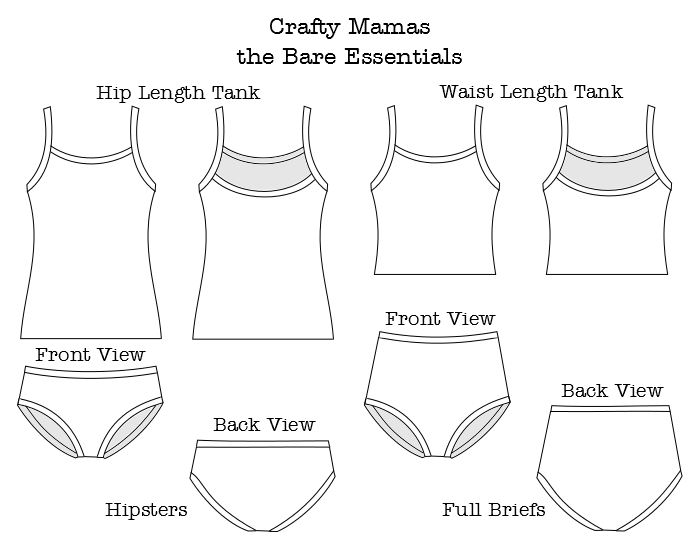
The Bare Essentials consists of a super comfy tank top in two lengths and amazingly comfy undies- elastic free- in full or hip style.


Let's sew up some Undie's of Awesome-ness! This is the " in the flat"  method, where our bands are all attached before the side seams and waist are sewn up. Very quick and easy.

SUGGESTED FABRICS
The Bare Essentials are designed for knit fabrics, preferably with a spandex content. Jersey,
interlock or rib knits may be used. For best results, I recommend high quality knits from Crafty Mamas!

WORKING WITH KNITS
Repeat after me..."Knits are NOT scary. Knits are your friend!"
Seriously, they are very forgiving! You have a little wiggle room with knits!

Just a few hints to help....

Be sure to wash, dry and iron your knit fabrics before you proceed to cut out, as they may
shrink. Wash colours with like- as new fabric colours run still.

When cutting out, ensure you have the greatest stretch running around the body, and that the
fabric is resting flat on the surface ie; not hanging off a table, that may distort your cutting.

Some knits with spandex can experience rolling along the selvage, which is jolly well annoying
when you are cutting out your pattern pieces. Carefully trim off the selvage and your fabric will
sit flat.

Sew your knit fabrics either with an overlocker/serger - or a sewing machine using stretch or
ballpoint needles.

If using a sewing machine - check manual for suitable stretch stitches. For hemming, use a
stitch that will still allow your garments to s-t-r-e-t-c-h or you will get popped stitches. A triple
stitch, a serpentine (3 step zig zag), or use a stretch twin needle to great effect too.

Always have your iron handy, the key to getting good sewing results with knits is pressing each
seam as you go.

Cutting out your UNDIES!


Cut 1 x UNDIES FRONT on the fold
Cut 1 x UNDIES BACK on the fold
Cut 1 x UNDIES LINER on the fold
*Cut 1 x Waistband
*Cut 2 x Legbands

*A quick word about the bands. The cutting measurements we give are a rough guide, you may find your fabric is super stretchy and you need to make them shorter- play it by ear!


1. Lay out all the cut pieces [in the following order, named from the bottom up]. Front (right
side up), Back (wrong side up), Liner (wrong side up) ** For a full front liner, cut out another
front piece in lining fabric instead of using the liner piece.


2. Stitch the crotch seam using a 3/8” (1 cm) seam allowance


3. Seam finish the other end of the liner [optional, as knits do not fray]. **Skip this step if
you are using a full front lining.

4. Flip the liner forward so the seam is in the middle -- laying on the front piece. Make sure
to pull it completely flat and pin in place. **If you are using a full front lining, the liner will align
with ALL the edges of the front piece. Pop a few pins in to keep it all nice and flat.


In this tute, I am applying the legbands and waistband " in the flat", where we
apply the legbands before sewing up the side seams. Stitch one side seam, then
apply the waistband and stitch up remaining side seam.

Let's grab our legbands and waistband strips....

And press them in half lengthwise....


Now grab one of your legbands, and mark halfway with a pin or chalk. Then divide your leg opening in half and mark also. Pin band to opening ( if you are good.....as many as you need).


Place your legband, right sides and raw edges together, on top of the leg opening. We are now going to sew the band on, just the same as we did for our Tshirt here.
Starting from one end, begin sewing...stretching the legband  slightly as you go but NOT the leg opening of the undies, to meet up with your next pin. ( be sure and remove pins before sewing!). You will eventually come to your 1/2 way mark, and now continue on sewing, slightly stretching the legband as you go to enable it to fit the leg opening area.

Turn, and press nicely....here's one legband finished!

Repeat with other legband and leg opening.... til you get both done! Press .

Inside shot of our liner sitting nice and flat.

Now see the seam allowance? Some folks like to topstitch that down, from the right side, using a serpentine stitch ( 3 step zig zag), to stop it annoying them. Personally, it does not bother me, so I leave.

Now we need to sew up our side seams! Lay your undies down, Front and Back together, right sides facing. Pin the sides- matching carefully the leg bands ( trim any excess legband you may have left).


When sewing " in the flat" you will always get a little bit of movement in your leg bands when you sew them- and this may cause them to be not aligned perfectly ( if this bothers you- go for sewing in the round instead, where the bands are enclosed and sewn on at the end). To minimize this movement, I like to pin the bands carefully together- and then  begin sewing them with the sewing machine...then stop and return to over locker and go over it, continuing down the entire seam.


Here's our first side seam done!
And opened out, give a good press...

Now before we sew up the other side seam, we are going to attach the waistband! Press it in half, raw sides and wrong sides together...as we did for our leg bands. Divide in half, mark, and do the same for our waistband opening.

Sew on as we did the leg bands.. turn and press.


And now sew up the remaining side seam, just as we did the first one!

Turn your undies right side out, press and topstitch around the waist if desired with serpentine stitch.

To finish off the ends where we have sewn up the side seams, trim back the thread on this final seam to a couple of cm's, then fold back on the actual seam..
Like this....

 
...and sew a few stitches to secure it . This tucks it in nicely and stops those straggly threads hanging out the ends of sleeves and neckbands, legbands etc.


Now how Quick and Easy was that? 

Enjoy making your new Crafty Mamas " Bare Essentials" undies in the flat!


About Me

Crafty Mamas SHOP blog. Aussie agent for Farbenmix, Studio Tantrum, Stenzo fabric, Ottobre design. Stocking Hilco fabric, Mamu design and other cool stuff!