

 WEEKEND NEWSLETTER! A couple of cool SALEs and a Sweet TUTE for you try this! KWIK SEW on SALE 20% off! The entire Kwik Sew range is 20% off til next Friday. This includes items in stock , and those we order in. We order each week and they genrerally arrive in a day or two. Want a patterns not instore? See the entire range here jot down the pattern number you want and email me. lisa@craftymamas.com.au Scandi Style "VICENTE" knits 20% off!  OTTO News! Just a quick note to our OTTOBRE DESIGN subscribers. When your subscription expires, you will not be automatically renewed or receive a reminder from OTTOBRE. So, to make sure you don't miss out...email me at lisa@craftymamas.com.au and I'll check on your subscription for you and we can renew you if needed! Of course, I'll have heaps in store for non subscribers to grab a copy too! Here's the fabulous Ottobre Design 6/2011, due out 21st October!  Crafty Mamas is very proud to be OTTOBRE's Aussie and NZ agent. As well as subscriptions we can also handle orders from retails shops etc. So if you have local sewing store trying to stock OTTOBRE, please tell them about us. We ae slowly spreading the Otto love! Ottobre Design Creative Workshop #301 Hack- Vintagey- Tab Front Tee Making more from your patterns! As promised, a weekend project for you to try!  Ottobre Design Creative Workshop #301 Hack to Vintagey Tab Tee. I love the look of these Vintagey style tees, they are a chance to incorporate some extra colour and texture into a plain tee. They are also very quick and easy once you have modified your pattern.  You will need : Your trusty Ottobre Design Creative Workshop #301, Enough solid knit to make your desired size, plus extra contrast knit for your yoke (use knits of a similar weight. I have used a cotton/lycra knit on the yoke, and it holds up well to the tab). I am using the CHERRY interlock and this cotton/lycra knit from Crafty Mamas. You’ll need a couple of buttons- either matching or not, odd ones look quirky! Tracing paper ( I use Kwik Trace or Swedish Tracing Paper from CM).  Now, trace off your desired size. You can see, I like to highlight the size I am going to trace. It just helps to see where you are going!  This also is a great time to show you how handy multisize patterns are when it comes to getting a good fit. My daughter needs a 152cm in width, but only 146cm in length. So I trace out the correct lines for these, eventually matching the lines up. This gives me a much better fit than just using the largest size.  You can see my handy work here, I have traced the 152cm width, but veered off to 146cm length lines on both front and back and sleeves.  Here’s my pattern pieces ready to go.  Now you have to decide the placement of your yoke piece. Mark a line how far across the shoulder and how far down the chest. See the orange lines?  Now you need to draft in a circle along these lines. I grabbed a dinner plate...as I want a rounded yoke. ( if you want more of an elongated oval shape, you will have to freehand it. Play around a bit on some paper first).  ..and traced around it. See the arc? ( raspberry chocolate bullets? How’d they get in there?)  Now you need to separate your yoke from your front piece. Simply cut. Mark the centre front section of yoke so you don’t confuse yourself.  Next up, cut out your yoke piece , with a centre front fold- remembering to add a seam allowance to the bottom side! We need to add a seam allowance, or your front piece will end up too short! This will be from your contrast fabric.  Here’s my pieces...  And all the pieces, including the neckand. Now we need to attach the yoke to our front piece. Mark the centre front on both pieces, I just pin. Then place right sides together and slowly and carefully, sew together. If you need, section of into 1/4s and match up ( similar to sewing on a neckband).  Here they are , sewn together , cool huh? Give it a press to make it all sit nice and flat. Clip if you think it needs it.  Now we need to draft up our tab piece. You can make this whatever shape you like...arrowed on one end looks cool, or just a longish piece with a rounded tab like here. The width and length is entirely up to you, as an idea, mine is about 12cm long ( this includes 2cm seam allowance ) and about 6cm wide ( includes 2cm seam allowance). Cut your piece out, then sew around three sides right sides together, leaving the short straight end open. Trim , turn and press.   Buttons: two ways to do this. I show #1. 1.Either sew the buttons directly onto your tab now. 2. Wait until tab is attached to top and then sew the buttons on, sewing through the tab and also into the yoke- thus securing your tab ( meaning it will be fixed).  Now mark the centre front of both your top and tab, then position the tab on your yoke. Secure with a few pins.  I like to topstitch around my yoke section, on the main fabric, with a ric rac stitch, ( or serpentine or elastic stitch ) to add a nice touch and help it sit better. 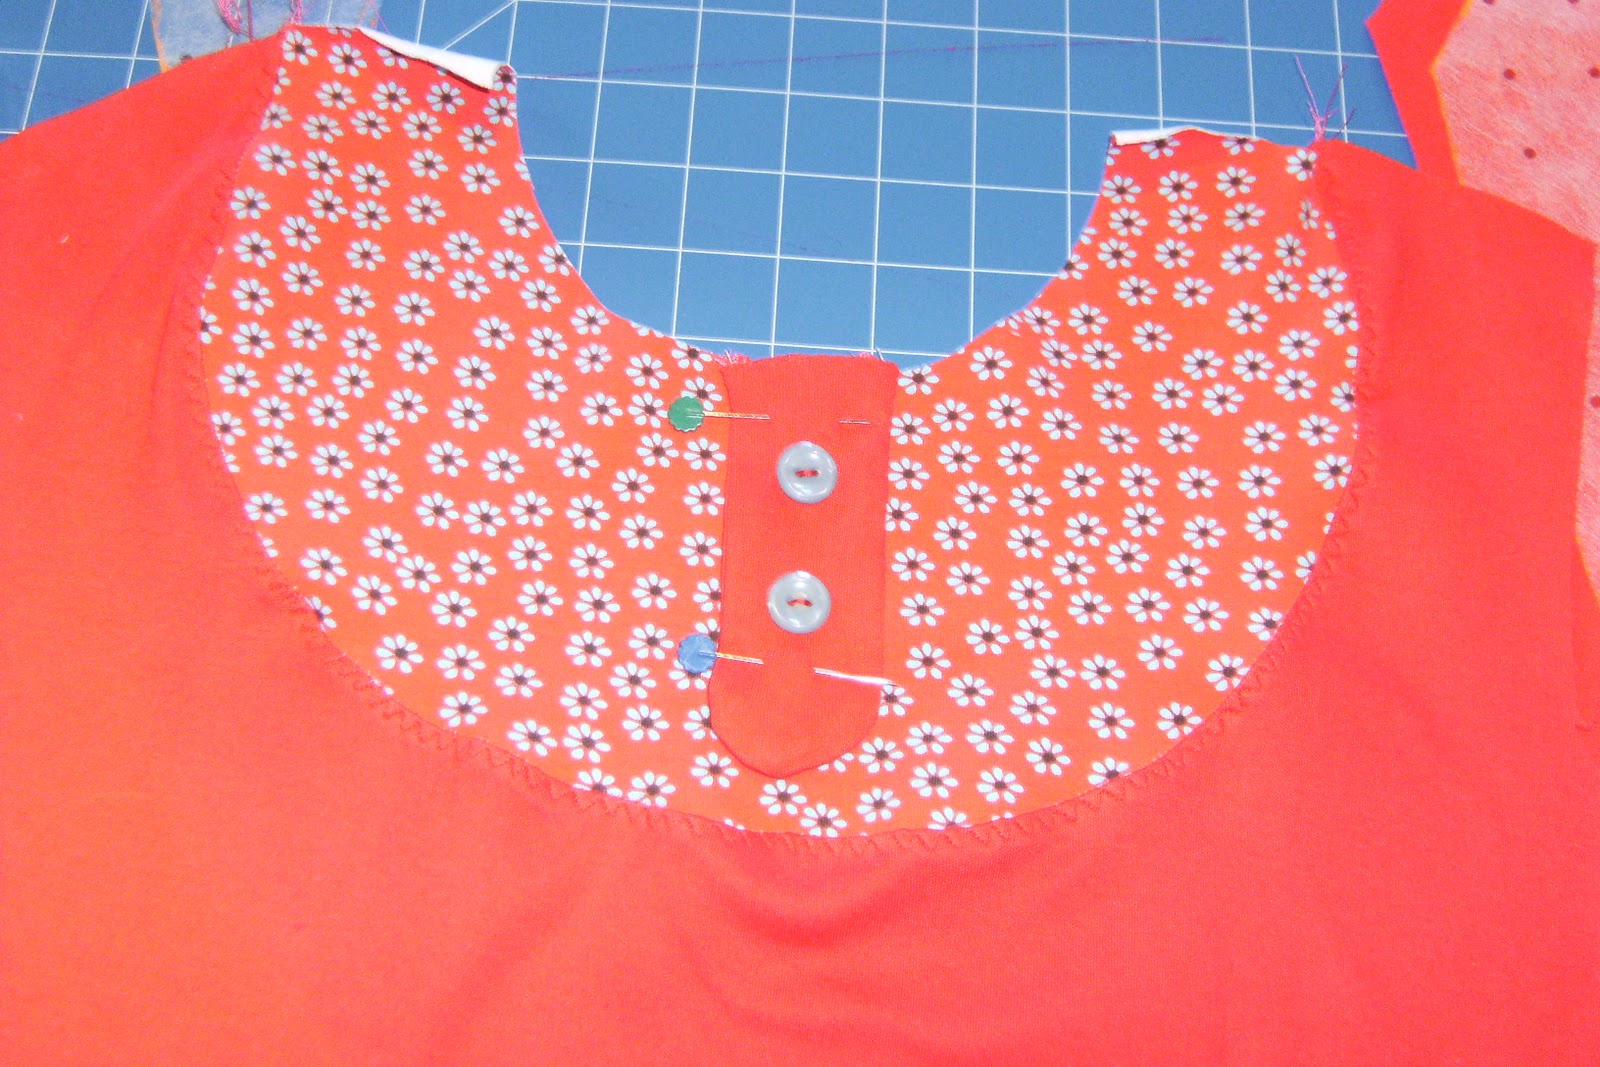 From here on in, the #301 is constructed as per usual. Simply apply your choice of neckband ( I have chosen the binding method, following the instructions in #301) ..here’s the binding being sewn down once it is attached and folded. Then continue on with your sleeves, sides etc..and you get...  THIS!!! Your super sweet modified #301 tab front tee! Have a lovely weekend! ~Lisa~ www.craftymamas.com.au |

Subscribe To
Saturday, October 15, 2011
Super Cute Otto #301 Vintagey Tute!
Subscribe to:
Post Comments (Atom)
4 comments:
Oh, I love it! Thanks for the inspiration :)
Great shirt! Thanks for the tutorial.
I love your tip of highlighting the size before tracing your pattern. Cleaver!
I love your idea of coloring the lines before tracing, never thought of it have done tracing patterns when my girls as they loved to get the latest design before any one else so I always got hold of the German pattern magazine, I have always used it as I am from Denmark. Now I only have grandsons and they do not want me to make their clothes. AAse Irene sullivan
Post a Comment